Wednesday, June 29, 2016
Earth 3D VR(Virtual Reality)
Earth 3D app provides many beautiful earth and many nation information.
This app has several earth texture, and you can change that.
If you may tap when the nation flag and border is appeared, the nation information of Wiki display.
You can understand many nation easily by Earth 3D.
● Change a earth texture
● Detection a nation
● Display a detected nation web page
● Screenshots
Thursday, June 9, 2016
Busan Aquarium - Finding Nemo
A saltwater fish is main actor of Finding Nemo animation.
There are many saltwater fish in Busan Aquarium.
If you visit to Busan, you go to here.
Wednesday, June 8, 2016
Busan Aquarium - Shark and Dragon's Header
Busan Aquarium is in korea.
If you visit here, you can see many shark and fish.
This movie is displayed the shark and dragon's header.
Friday, May 13, 2016
MSSQL - How to convert DateTime to VarChar.
The below query convert DateTime to VarChar.
If you execute it, you can understand easily.
1 2 3 4 5 6 7 8 9 10 11 12 13 14 15 16 17 18 19 20 21 22 23 24 25 26 27 28 29 30 31 32 33 34 35 36 37 38 39 40 41 42 43 | SELECT 10, 'mm-dd-yy', CONVERT(VARCHAR, GETDATE(), 10) UNION SELECT 11, 'yy/mm/dd', CONVERT(VARCHAR, GETDATE(), 11) UNION SELECT 12, 'yymmdd', CONVERT(VARCHAR, GETDATE(), 12) UNION SELECT 23, 'yyyy-mm-dd', CONVERT(VARCHAR, GETDATE(), 23) UNION SELECT 100, 'mon dd yyyy hh:miAM(PM)', CONVERT(VARCHAR, GETDATE(), 100) UNION SELECT 101, 'mm/dd/yyyy', CONVERT(VARCHAR, GETDATE(), 101) UNION SELECT 102, 'yyyy.mm.dd', CONVERT(VARCHAR, GETDATE(), 102) UNION SELECT 103, 'dd/mm/yyyy', CONVERT(VARCHAR, GETDATE(), 103) UNION SELECT 104, 'dd.mm.yyyy', CONVERT(VARCHAR, GETDATE(), 104) UNION SELECT 105, 'dd-mm-yyyy', CONVERT(VARCHAR, GETDATE(), 105) UNION SELECT 106, 'dd mon yyyy', CONVERT(VARCHAR, GETDATE(), 106) UNION SELECT 107, 'Mon dd, yyyy', CONVERT(VARCHAR, GETDATE(), 107) UNION SELECT 108, 'hh:mm:ss', CONVERT(VARCHAR, GETDATE(), 108) UNION SELECT 109, 'mon dd yyyy hh:mi:ss:mmmAM(PM)', CONVERT(VARCHAR, GETDATE(), 109) UNION SELECT 110, 'mm-dd-yyyy', CONVERT(VARCHAR, GETDATE(), 110) UNION SELECT 111, 'yyyy/mm/dd', CONVERT(VARCHAR, GETDATE(), 111) UNION SELECT 112, 'yyyymmdd', CONVERT(VARCHAR, GETDATE(), 112) UNION SELECT 113, 'mon yyyy hh:mi:ss:mmm (24h)', CONVERT(VARCHAR, GETDATE(), 113) UNION SELECT 114, 'hh:mi:ss:mmm (24h)', CONVERT(VARCHAR, GETDATE(), 114) UNION SELECT 120, 'yyyy-mm-dd hh:mi:ss (24h)', CONVERT(VARCHAR, GETDATE(), 120) UNION SELECT 121, 'yyyy-mm-dd hh:mi:ss.mmm (24h)', CONVERT(VARCHAR, GETDATE(), 121) UNION SELECT 126, 'yyyy-mm-ddThh:mi:ss.mmm', CONVERT(VARCHAR, GETDATE(), 126) |
How to get MSSQL's tables, view and column information.
We can take a look at MS-SQL's the tables, the views and the columns by below sql query.
1 2 3 4 5 6 7 8 | -- Tables Information SELECT * FROM INFORMATION_SCHEMA.TABLES -- View Information SELECT * FROM INFORMATION_SCHEMA.VIEWS -- Column Information SELECT * FROM INFORMATION_SCHEMA.COLUMNS |
Thursday, May 12, 2016
How to create a context menu in WPF.
It is the way creating a ContextMenu in WPF.
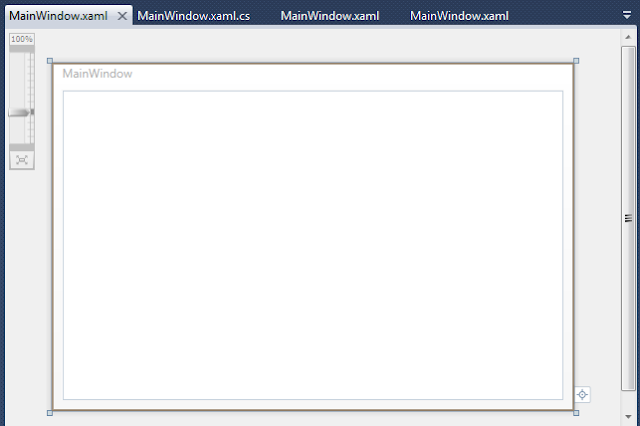
1. Select a window on the design UI of the your project.
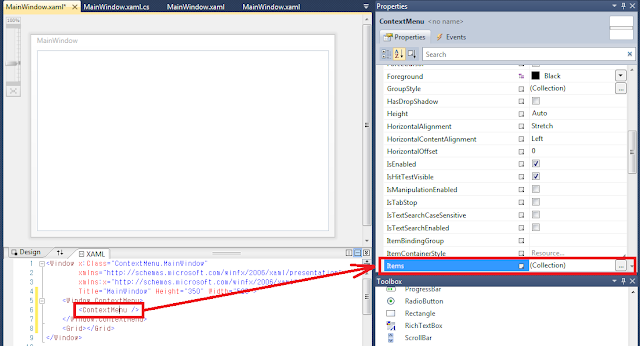
※ You can check a added Window.ContextMenu tag on the XAML, look like the below image.
3. Display the properties of the ContextMenu when selecting a ContextMenu tag.
※ You can select the ContextMenu object on the Document Outline.
4. Open Collection Edition Items window, when click a button of the ContextMenu's Items property.
5. MenuItem is added when click Add button.
※ You can check a added MenuItem tag on the XAML, look like the below image.
6. If you run your project and click a right button of a mouse, you can see the context menu on the run window.
1. Select a window on the design UI of the your project.
2. Select a ContextMenu item on the combo box of the window's a ContextMenu property.
※ You can check a added Window.ContextMenu tag on the XAML, look like the below image.
3. Display the properties of the ContextMenu when selecting a ContextMenu tag.
※ You can select the ContextMenu object on the Document Outline.
4. Open Collection Edition Items window, when click a button of the ContextMenu's Items property.
5. MenuItem is added when click Add button.
※ You can check a added MenuItem tag on the XAML, look like the below image.
6. If you run your project and click a right button of a mouse, you can see the context menu on the run window.
Wednesday, May 4, 2016
Creating WPF Project on Microsoft Visual Studio
It is very easy to create WPF project on Microsoft Visual Studio.
1. Click File > New > Project menu.
2. Click Ok button after selecting WPF Application, writing Name/Location/Solution name.
3. Creating WPF Application Project.
4. You can add the controls on the Window.
5. Below image is the running application.
1. Click File > New > Project menu.
2. Click Ok button after selecting WPF Application, writing Name/Location/Solution name.
3. Creating WPF Application Project.
4. You can add the controls on the Window.
5. Below image is the running application.
Tuesday, April 26, 2016
WPF - How to create window without title bar.
1. Change WindowStyle property.(Remove the title bar)
(1) You can set "WindowStyle=None".
(2) Below image is the Window without the title bar.
2. Change AllowsTransparency property.(Remove the border of the window)
(1) You can set "AllowsTransparency=true".
(2) Below image is the Window without the border.
3. Change the border of the Window.
(1) You can set "BorderBrush=Black" and "BorderThickness=1".
- BorderBrush is the border color.
- BorderThickness is the thickness of the border.
(2) Below image is the window with the border.
4. Move the window.
If the window is disappeared the title bar, you can not move the window.
So you have to add the event of Mouse Left Button Down.
(1) Add MouseLeftButtonDown event.
(2) Type the below code in the MouseLeftButtonDown event.
5. Resize Window.
If the window is disappeared the title bar and the border, you can not resize the window.
So you have to change ResizeMode property.
(1) You set "ResizeMode=CanResizeWithGrip"
(2) Display the grip the right and the bottom of the Window.
You can resize the grip.
(1) You can set "WindowStyle=None".
(2) Below image is the Window without the title bar.
2. Change AllowsTransparency property.(Remove the border of the window)
(1) You can set "AllowsTransparency=true".
(2) Below image is the Window without the border.
3. Change the border of the Window.
(1) You can set "BorderBrush=Black" and "BorderThickness=1".
- BorderBrush is the border color.
- BorderThickness is the thickness of the border.
(2) Below image is the window with the border.
4. Move the window.
If the window is disappeared the title bar, you can not move the window.
So you have to add the event of Mouse Left Button Down.
(1) Add MouseLeftButtonDown event.
(2) Type the below code in the MouseLeftButtonDown event.
1 2 3 4 | private void Window_MouseLeftButtonDown(object sender, MouseButtonEventArgs e) { this.DragMove(); } |
5. Resize Window.
If the window is disappeared the title bar and the border, you can not resize the window.
So you have to change ResizeMode property.
(1) You set "ResizeMode=CanResizeWithGrip"
(2) Display the grip the right and the bottom of the Window.
You can resize the grip.
Thursday, April 21, 2016
Android - How to create a custom listview in android.
It is the way creating a custom listview in android.
1. Create Android Project
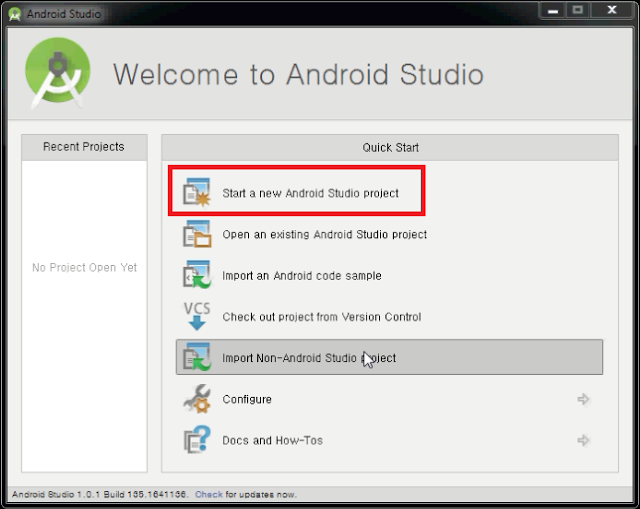
(1) Click the Start a new Android Studio project.
(2) Click the next button after type Application name and Company Domain.
(Create package name by company domain and application name.)
(3) Click the next button after check Pone and Tablet Check Box.
(4) Click the next button after select Blank Activity.
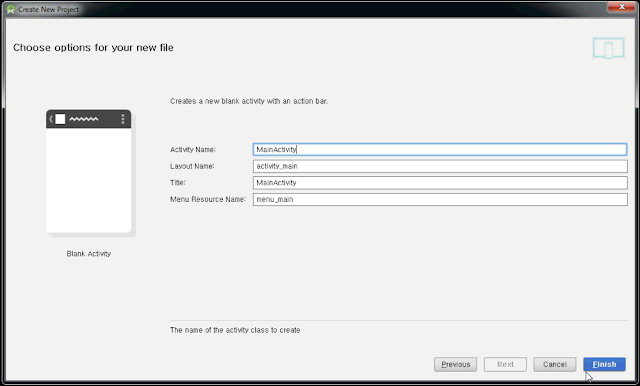
(5) Click the finish button after type Activity Name, Layout Name, Title, and Menu Resource Name.
(If the finish button is clicked, Android Project is created)
2. Add a ListView in the activity layout, look like below image.
- Activity Layout Source
1 2 3 4 5 6 7 8 9 10 11 12 | <RelativeLayout xmlns:android="http://schemas.android.com/apk/res/android" xmlns:tools="http://schemas.android.com/tools" android:layout_width="match_parent" android:layout_height="match_parent" android:paddingLeft="@dimen/activity_horizontal_margin" android:paddingRight="@dimen/activity_horizontal_margin" android:paddingTop="@dimen/activity_vertical_margin" android:paddingBottom="@dimen/activity_vertical_margin" tools:context=".MainActivity"> <ListView android:id="@+id/listview" android:layout_width="match_parent" android:layout_height="match_parent"/> </RelativeLayout> |
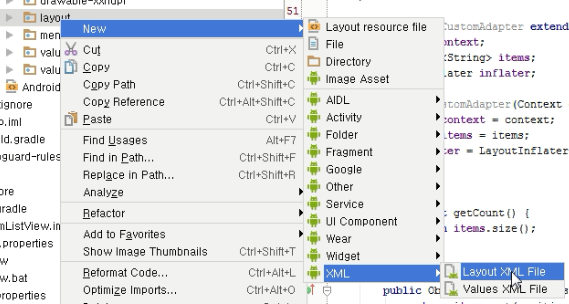
(1) Click the menu of Layout XML File, look like below image.
(2) Click the finish button after type Layout File Name and Root Tag.
(3) Add a ImageView and a TextView in the list item layout, look like below image.
- List item layout source.
1 2 3 4 5 6 7 8 9 10 11 12 13 14 15 16 17 18 19 20 | <?xml version="1.0" encoding="utf-8"?> <LinearLayout xmlns:android="http://schemas.android.com/apk/res/android" android:layout_width="match_parent" android:layout_height="match_parent" android:orientation="horizontal"> <ImageView android:layout_width="100dp" android:layout_height="50dp" android:layout_gravity="center_vertical" android:src="@drawable/south_korea" android:id="@+id/imageView" /> <TextView android:layout_width="match_parent" android:layout_height="wrap_content" android:layout_margin="5dp" android:layout_gravity="center_vertical" android:text="Korea" android:id="@+id/textView" /> </LinearLayout> |
4. Type the code in the activity, look like below image
1 2 3 4 5 6 7 8 9 10 11 12 13 14 15 16 17 18 19 20 21 22 23 24 25 26 27 28 29 30 31 32 33 34 35 36 37 38 39 40 41 42 43 44 45 46 47 48 49 50 51 52 53 54 55 56 57 58 59 60 61 62 63 64 65 66 67 68 69 70 71 72 73 74 75 76 77 78 79 80 81 82 83 84 85 86 87 88 89 90 91 92 93 94 95 96 97 98 99 100 101 102 | package com.jmsys.customlistview; import android.content.Context; import android.support.v7.app.ActionBarActivity; import android.os.Bundle; import android.view.LayoutInflater; import android.view.View; import android.view.ViewGroup; import android.widget.AdapterView; import android.widget.BaseAdapter; import android.widget.ImageView; import android.widget.ListView; import android.widget.TextView; import android.widget.Toast; import java.util.ArrayList; public class MainActivity extends ActionBarActivity { ListView listview; @Override protected void onCreate(Bundle savedInstanceState) { super.onCreate(savedInstanceState); setContentView(R.layout.activity_main); listview = (ListView)this.findViewById(R.id.listview); // Create ListView Data ArrayList<String> list = new ArrayList<String>(); list.add("Korea"); list.add("USA"); list.add("Germany"); // Custom Adapter Instance CustomAdapter adapter = new CustomAdapter(this, list); // Set a custom adapter on the ListView listview.setAdapter(adapter); // Add a Item Click Event on the ListView listview.setOnItemClickListener(new AdapterView.OnItemClickListener() { @Override public void onItemClick(AdapterView<?> parent, View view, int position, long id) { CustomAdapter adapter = (CustomAdapter)listview.getAdapter(); Toast.makeText(MainActivity.this, adapter.getItem(position).toString(), Toast.LENGTH_LONG).show(); } }); } // Custom Adapter Inner Class public class CustomAdapter extends BaseAdapter{ Context context; ArrayList<String> items; LayoutInflater inflater; public CustomAdapter(Context context, ArrayList<String> items){ this.context = context; this.items = items; inflater = LayoutInflater.from(context); } @Override public int getCount() { return items.size(); } @Override public Object getItem(int position) { return items.get(position); } @Override public long getItemId(int position) { return position; } @Override public View getView(int position, View convertView, ViewGroup parent) { View v = convertView; if(v == null){ v = inflater.inflate(R.layout.list_item, null); } ImageView imageView = (ImageView)v.findViewById(R.id.imageView); TextView textView = (TextView)v.findViewById(R.id.textView); String nation = items.get(position); textView.setText(nation); // Set a image of ImageView if("Korea".equals(nation)){ imageView.setImageResource(R.drawable.south_korea); }else if("USA".equals(nation)){ imageView.setImageResource(R.drawable.usa); }else if("Germany".equals(nation)){ imageView.setImageResource(R.drawable.germany); } return v; } } } |
※ Refer below video.
Monday, April 18, 2016
WPF - How to bind custom class in a DataGrid?
It is the way binding a custom class to a WPF GataGrid.
1. Add the DataGrid on the Window.
2. Add the columns in the DataGrid.
3. Bind a custom property in the columns of the DataGrid
4. Add the Loaded Event of the Window.
5. Type below codes in the Window Loaded Event.
6. Below image is result.
※ You can refer the below video.
1. Add the DataGrid on the Window.
2. Add the columns in the DataGrid.
3. Bind a custom property in the columns of the DataGrid
1 2 3 4 5 6 7 8 9 10 11 12 13 | <Window x:Class="BindingCustomClassToDataGrid.MainWindow" xmlns="http://schemas.microsoft.com/winfx/2006/xaml/presentation" xmlns:x="http://schemas.microsoft.com/winfx/2006/xaml" Title="MainWindow" Height="350" Width="525" Loaded="Window_Loaded"> <Grid> <DataGrid AutoGenerateColumns="False" Name="dataGrid1"> <DataGrid.Columns> <DataGridTextColumn Header="ID" Binding="{Binding ID}"/> <DataGridTextColumn Header="Name" Binding="{Binding UserName}"/> </DataGrid.Columns> </DataGrid> </Grid> </Window> |
4. Add the Loaded Event of the Window.
5. Type below codes in the Window Loaded Event.
1 2 3 4 5 6 7 8 9 10 11 12 13 14 15 16 17 18 19 20 21 22 23 24 25 26 27 28 29 30 31 32 33 34 35 | using System; using System.Collections.Generic; using System.Linq; using System.Text; using System.Windows; using System.Windows.Controls; using System.Windows.Data; using System.Windows.Documents; using System.Windows.Input; using System.Windows.Media; using System.Windows.Media.Imaging; using System.Windows.Navigation; using System.Windows.Shapes; namespace BindingCustomClassToDataGrid { public partial class MainWindow : Window { public MainWindow() { InitializeComponent(); } private void Window_Loaded(object sender, RoutedEventArgs e) { List<CustomClass> list = new List<CustomClass>(); list.Add(new CustomClass { ID = "ID-01", UserName = "Name-01" }); list.Add(new CustomClass { ID = "ID-02", UserName = "Name-02" }); list.Add(new CustomClass { ID = "ID-03", UserName = "Name-03" }); list.Add(new CustomClass { ID = "ID-04", UserName = "Name-04" }); dataGrid1.ItemsSource = list; } } } |
6. Below image is result.
※ You can refer the below video.
Thursday, April 14, 2016
WPF - Binding DataTable to a DataGrid
It is the way binding a DataTable to a GataGrid
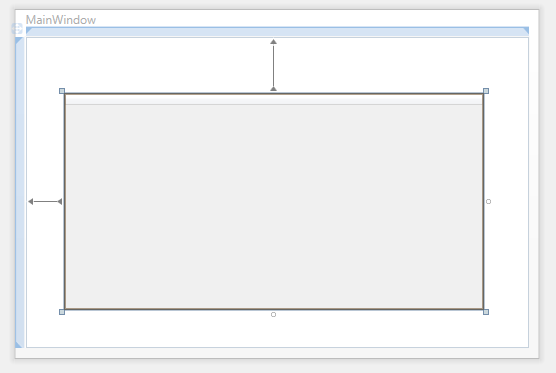
1. Add the DataGrid on the Window.
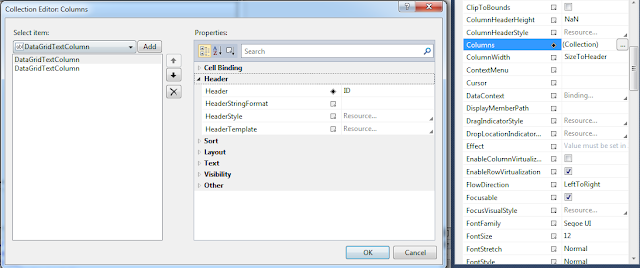
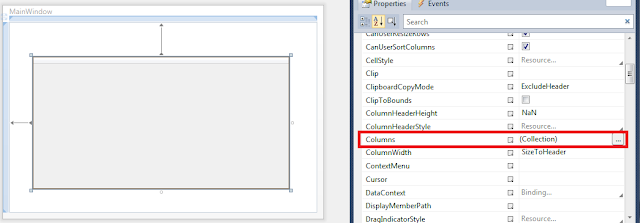
2. Click the columns property button[...] on the Properties of DataGrid
3. Add the three colums to the DataGrid.
4. Type the Binding attribute on the DataGridTextColumn tag.
5. Add the Loaded event of the Window.
6. Type the below code to the Window's Loaded event.
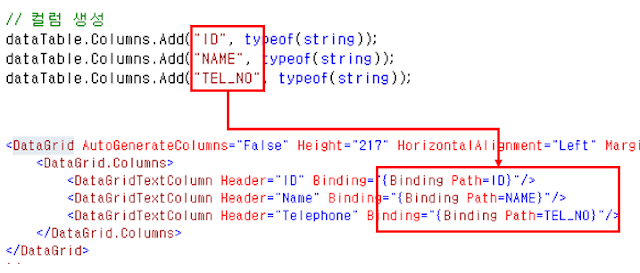
※ Refer below binding the columns of DataTable and DataGrid
7. Below image is result.
Refer below video.
1. Add the DataGrid on the Window.
2. Click the columns property button[...] on the Properties of DataGrid
3. Add the three colums to the DataGrid.
4. Type the Binding attribute on the DataGridTextColumn tag.
1 2 3 4 5 6 7 | <DataGrid AutoGenerateColumns="False" Height="217" HorizontalAlignment="Left" Margin="38,56,0,0" Name="dataGrid1" VerticalAlignment="Top" Width="420"> <DataGrid.Columns> <DataGridTextColumn Header="ID" Binding="{Binding Path=ID}"/> <DataGridTextColumn Header="Name" Binding="{Binding Path=NAME}"/> <DataGridTextColumn Header="Telephone" Binding="{Binding Path=TEL_NO}"/> </DataGrid.Columns> </DataGrid> |
5. Add the Loaded event of the Window.
6. Type the below code to the Window's Loaded event.
1 2 3 4 5 6 7 8 9 10 11 12 13 14 15 16 17 18 19 20 21 22 23 24 25 26 27 28 29 30 31 32 33 34 35 36 37 38 39 40 41 42 43 44 45 | using System; using System.Collections.Generic; using System.Linq; using System.Text; using System.Windows; using System.Windows.Controls; using System.Windows.Data; using System.Windows.Documents; using System.Windows.Input; using System.Windows.Media; using System.Windows.Media.Imaging; using System.Windows.Navigation; using System.Windows.Shapes; using System.Data; namespace DataGridBinding { public partial class MainWindow : Window { public MainWindow() { InitializeComponent(); } private void Window_Loaded(object sender, RoutedEventArgs e) { // Create DataTable instance. DataTable dataTable = new DataTable(); // Add the columns. dataTable.Columns.Add("ID", typeof(string)); dataTable.Columns.Add("NAME", typeof(string)); dataTable.Columns.Add("TEL_NO", typeof(string)); // Add the datas. dataTable.Rows.Add(new string[] { "ID-01", "Name 01", "010-0001-0000" }); dataTable.Rows.Add(new string[] { "ID-02", "Name 02", "010-0002-0000" }); dataTable.Rows.Add(new string[] { "ID-03", "Name 03", "010-0003-0000" }); dataTable.Rows.Add(new string[] { "ID-04", "Name 04", "010-0004-0000" }); // Binding DataView of DataTable. dataGrid1.ItemsSource = dataTable.DefaultView; } } } |
※ Refer below binding the columns of DataTable and DataGrid
7. Below image is result.
Refer below video.
Subscribe to:
Posts (Atom)